 sidingora.com
Q: “I just had my garage sided with white cedar shingles. I want them to turn a lovely...
Complete Siding Installation Guide: Step-by-Step Process from Preparation to Finishing
The installation of exterior siding represents one of the most significant investments in residential construction and renovation, directly affecting both the aesthetic appeal and functional performance of a building envelope. Proper installation techniques ensure optimal weather protection, energy efficiency, and long-term durability while maximizing the value of materials selected for the project. Understanding the comprehensive process from initial planning through final finishing enables homeowners and contractors to achieve professional results that withstand environmental challenges for decades.
Modern siding systems have evolved far beyond simple weather barriers to incorporate sophisticated engineering principles that address thermal performance, moisture management, and structural integration. Contemporary installation methodologies reflect this evolution, requiring careful attention to manufacturer specifications, building science principles, and proven field techniques. The systematic approach outlined in this guide provides the foundation for successful siding installation across various material types and architectural configurations.
Material Selection and Quantity Calculation
The foundation of successful siding installation begins with selecting appropriate materials that match project requirements, climate conditions, and aesthetic objectives. Vinyl siding remains the most popular choice for residential applications, offering excellent durability and minimal maintenance requirements at moderate cost. This material expands and contracts with temperature variations, requiring specific installation techniques that accommodate thermal movement. Fiber cement siding provides superior fire resistance and dimensional stability compared to vinyl, though installation demands more robust structural support due to increased weight. Metal siding delivers exceptional durability and contemporary aesthetics, particularly suited for modern architectural styles and commercial applications.
Material quantity calculations require precise measurements of all wall surfaces, accounting for windows, doors, and other openings that reduce coverage area. The basic calculation multiplies wall height by width for each surface, then subtracts openings to determine net coverage area. Professional installers typically add ten to fifteen percent to calculated quantities, accounting for cutting waste, complex architectural details, and future repair needs. This buffer proves particularly important for discontinued color patterns or textured finishes that may become unavailable after initial purchase.
Accessory components represent a critical aspect of material planning that novice installers often underestimate. Starter strips, corner posts, J-channels, utility trim, and finishing profiles comprise essential elements that frame and secure primary siding panels. The quantity of each accessory type depends on specific building geometry, requiring careful measurement of all corners, window perimeters, door frames, and roof intersections. Proper accessory selection ensures professional appearance and weather-tight performance throughout the installation.
Color selection extends beyond aesthetic preferences to influence thermal performance and long-term maintenance requirements. Dark colors absorb more solar radiation, potentially increasing cooling costs in warm climates while providing beneficial passive heating in colder regions. Light colors reflect solar energy, reducing heat absorption but potentially showing dirt and environmental staining more readily. Modern coating technologies have expanded color options while maintaining fade resistance, though manufacturers typically provide longer warranty coverage for lighter shades that experience less thermal stress.
Essential Tools and Equipment Preparation
Professional siding installation requires specialized tools beyond standard carpentry equipment, ensuring precision cuts, proper fastening, and efficient workflow throughout the project. A quality circular saw equipped with fine-tooth blade specifically designed for siding materials enables clean, accurate cuts without excessive chipping or melting. Tin snips or aviation shears prove essential for trimming vinyl and aluminum accessories, particularly for intricate cuts around obstacles or architectural details. A pneumatic nail gun calibrated for siding fasteners dramatically increases installation speed while ensuring consistent fastener depth and spacing.
Measurement and layout tools establish the foundation for accurate installation that maintains proper alignment throughout the project. A quality laser level projects perfectly horizontal reference lines across entire wall surfaces, eliminating cumulative error that plagues traditional chalk line methods. Metal framing squares and speed squares facilitate precise angle cuts for gable ends and complex architectural features. A reliable tape measure with clear markings and secure lock mechanism prevents measurement errors that compound across large wall surfaces.
Safety equipment protects installers from common hazards associated with exterior construction work. Sturdy scaffolding or properly secured ladders provide stable work platforms at various heights, essential for maintaining quality standards throughout vertical surfaces. Safety glasses shield eyes from debris during cutting operations, while work gloves protect hands without compromising dexterity needed for fastener installation. Fall protection equipment becomes mandatory when working at heights exceeding standard safety thresholds, typically beginning at six feet above ground level.
Specialized installation tools address specific challenges encountered during siding projects. A snap lock punch creates raised tabs on cut panel edges, enabling proper engagement with receiving channels when factory-formed locks have been removed. Unlocking tools facilitate panel removal for repairs or adjustments without damaging surrounding materials. Zip tools slide along panel seams to disengage interlocking mechanisms, proving invaluable when correcting installation errors or accessing building envelope components during future maintenance.
Wall Surface Preparation and Inspection
Thorough wall preparation establishes the foundation for successful siding installation, addressing structural issues that could compromise long-term performance. Existing surfaces require comprehensive inspection to identify damage, deterioration, or defects requiring remediation before new siding installation proceeds. Rotted wood sheathing must be replaced with sound material, ensuring adequate structural support for fastener penetration. Loose or damaged building wrap necessitates repair or replacement to maintain moisture barrier integrity that protects against water infiltration behind the new siding system.
Surface preparation extends to removing obstacles that interfere with smooth siding installation or create potential damage points. Light fixtures, electrical outlets, hose bibs, and decorative elements mounted on wall surfaces require temporary removal or permanent relocation. Vegetation growing against building walls must be trimmed back, establishing clearance that prevents moisture retention and facilitates proper air circulation behind the siding system. Downspouts and gutter components may require adjustment to accommodate new wall thickness created by furring strips or insulation layers.
Wall flatness significantly influences siding appearance and performance, with irregular surfaces creating visible waves or gaps in the finished installation. Systematic inspection using straight edges or taut strings identifies high and low spots requiring correction before siding installation begins. Protruding nails, loose sheathing boards, and damaged areas receive attention to create uniform mounting surface. Shimming low areas with appropriate thickness materials ensures consistent plane for furring strip attachment, while grinding or planing reduces extreme high spots that exceed shimming capabilities.
Moisture assessment identifies existing problems requiring resolution before enclosing walls with new siding materials. Water stains on sheathing indicate active leaks demanding immediate attention to prevent progressive structural damage. Soft spots suggesting hidden moisture accumulation necessitate investigation to determine source and extent of water intrusion. Addressing moisture issues before siding installation prevents trapping water within wall assemblies, where ongoing deterioration continues unseen until major damage requires expensive remediation.
Furring Strip Installation and Framework Construction
Furring strip installation creates the structural framework supporting siding panels while establishing consistent plane for professional appearance. Vertical orientation proves standard for horizontal siding panels, with strips spaced according to manufacturer specifications that typically range from sixteen to twenty-four inches on center. This spacing ensures adequate support preventing panel sagging or oil-canning while accommodating standard insulation widths when thermal upgrades accompany siding replacement. Horizontal furring orientation suits vertical siding patterns, maintaining proper support configuration regardless of panel direction.
Material selection for furring strips balances cost, durability, and performance requirements specific to local climate conditions. Pressure-treated lumber resists decay and insect damage, particularly important in humid climates or areas with ground contact exposure. Cedar and other naturally decay-resistant species provide excellent performance without chemical treatment, though premium pricing may exceed project budgets. Metal furring systems offer dimensional stability and corrosion resistance, eliminating concerns about warping or twisting that occasionally affect wood materials during seasonal moisture cycles.
Installation technique determines framework quality that directly influences final siding appearance and structural integrity. Each furring strip must align precisely with adjacent strips, maintaining consistent plane throughout entire wall surface. String lines stretched between corner strips establish reference guides ensuring intermediate strips achieve proper alignment without bows or twists. Shims placed behind strips compensate for wall irregularities, creating uniform mounting surface despite variations in underlying substrate. Fastener selection accounts for substrate material and required penetration depth, with corrosion-resistant screws providing superior holding power compared to nails in most applications.
Special attention to corners, openings, and transitions ensures complete structural support throughout complex architectural features. Additional furring strips frame all window and door perimeters, providing solid backing for J-channel installation and trim components. Corners receive double strips creating secure nailing surface for corner posts on both adjacent walls. Horizontal blocking between vertical furring strips strengthens areas subject to impact or requiring supplemental support for heavy accessories like light fixtures or decorative elements.
| Furring Strip Material | Cost per Linear Foot | Durability Rating | Installation Complexity | Best Applications |
| Pressure-Treated Pine | $0.50-0.75 | Excellent | Low | General residential use, humid climates |
| Cedar | $2.00-3.50 | Excellent | Low | Premium installations, natural aesthetics |
| Vinyl-Clad Wood | $1.25-2.00 | Very Good | Moderate | Moisture-prone areas, minimal maintenance |
| Galvanized Steel | $1.50-2.25 | Excellent | Moderate | Commercial applications, fire-resistant systems |
| Aluminum | $2.25-3.00 | Very Good | Moderate | Coastal environments, corrosion resistance critical |
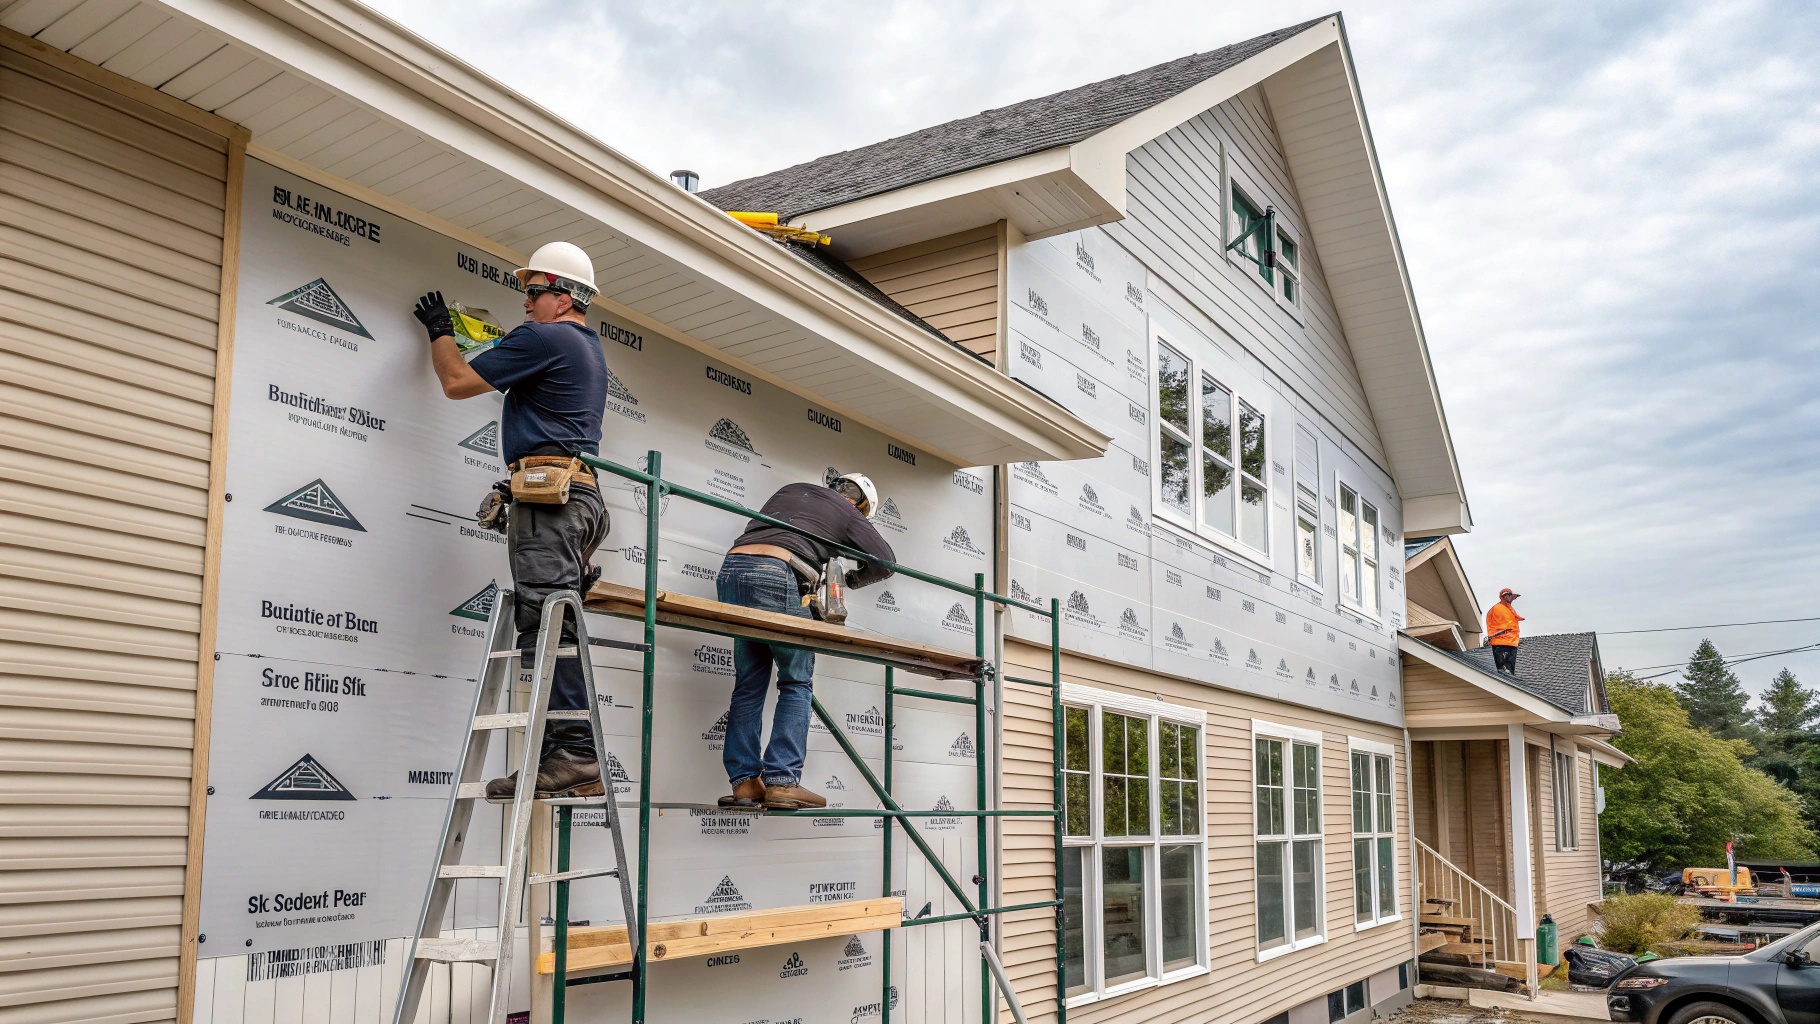
Starter Strip and Corner Post Installation
Starter strip installation establishes the critical foundation that determines alignment for all subsequent siding courses, making precise placement essential for professional results. The bottom edge of the starter strip positions approximately forty millimeters above the bottom of wall sheathing, accounting for foundation irregularities while maintaining adequate clearance from grade or concrete surfaces. A continuous chalk line snapped at consistent height around building perimeter guides starter strip placement, with frequent level verification confirming horizontal alignment despite foundation variations. Fasteners penetrate furring strips at intervals specified by manufacturer guidelines, typically spacing every eight to twelve inches while maintaining quarter-inch clearance from strip ends to accommodate thermal expansion.
Corner post installation frames building corners and establishes vertical reference lines guiding siding panel placement throughout wall surfaces. Posts extend from slightly below starter strip level to just beneath soffit or frieze board, creating continuous vertical trim element that conceals panel edges while accommodating expansion and contraction. Plumb installation proves absolutely critical, as even slight deviation compounds across multiple siding courses to create increasingly obvious alignment problems. Temporary bracing holds posts in perfect plumb during fastener installation, with verification at multiple heights ensuring consistency throughout full post length.
Inside corners receive similar attention using either preformed inside corner posts or J-channel assemblies that create weather-resistant transitions between perpendicular walls. Inside corner solutions must accommodate differential movement between adjacent wall surfaces while maintaining weather-tight seal that prevents water intrusion. The installation sequence typically places inside corners before outside corners, establishing framework that guides subsequent component placement. Proper spacing from wall surfaces allows siding panels to slide freely within channels while maintaining adequate engagement for secure mechanical connection.
Fastening technique for corner posts and starter strips follows specific protocols that prevent material damage while ensuring adequate holding power. Fasteners center within mounting slots rather than at slot ends, permitting thermal movement without restriction or buckling. Slight looseness in fastener installation allows material to move freely, with quarter-inch gap between fastener head and mounting surface accommodating expansion without creating bulges or waves. Driving fasteners through material face rather than through designated slots creates rigid connection that inevitably leads to buckling or cracking as temperature variations induce expansion or contraction.
Window and Door Opening Treatment
Window and door openings require specialized trim components that frame openings while channeling water away from vulnerable penetrations in building envelope. J-channel installation around opening perimeters creates receiving slots for siding panel ends while providing architectural definition that enhances visual appeal. The bottom channel receives particular attention, installing with slight outward slope that promotes drainage away from window assembly rather than allowing water to pool against vulnerable seals. Corner joints in J-channel assemblies require careful cutting and fitting to create weather-tight intersections that prevent water infiltration while maintaining clean appearance.
Installation sequence around openings follows systematic approach that ensures proper water management through layered components. The top J-channel installs first, overlapping side channels to direct water outward rather than into channel cavities. Side channels install next, cutting bottom ends at angles that create drainage tabs extending beyond bottom channel. The bottom channel installs last, receiving angled ends of side channels that direct water forward and away from opening. This lapped installation sequence creates shingle effect that progressively directs water downward and outward, preventing accumulation within trim assemblies.
Flashing integration with window trim represents critical weatherproofing measure often overlooked in residential installations. Self-adhesive flashing membrane applied over top J-channel extends onto wall surface and window frame, creating continuous barrier against water intrusion at this vulnerable transition. Side flashing extends from window frame onto J-channel flanges, maintaining water-shedding continuity throughout opening perimeter. Bottom flashing or pan systems collect any water penetrating upper assemblies, directing moisture outward through weep holes or drainage gaps rather than into wall cavity.
Proper clearance between siding panels and window or door trim maintains necessary expansion gaps while creating professional appearance. Panels should slide easily into J-channel slots without forcing or excessive pressure that could restrict thermal movement. Quarter-inch gap between panel end and channel back allows expansion while remaining concealed within channel depth. Oversized openings cut in panels for windows or doors receive finish trim that conceals rough edges while maintaining necessary clearances throughout seasonal temperature cycles.
Primary Siding Panel Installation Techniques

The installation of primary siding panels requires systematic approach that maintains consistent alignment, proper fastening, and adequate expansion allowance throughout wall surfaces. The first course of panels engages starter strip along bottom edge, with mechanical interlock providing secure connection while allowing lateral movement during temperature variations. Panel positioning accounts for corner post channels at wall ends, sliding panel ends into receiving slots with quarter-inch clearance on each end. This clearance proves critical for preventing buckling during warm weather expansion, with inadequate space causing visible waves or buckles that detract from appearance.
Fastening technique directly influences long-term panel performance and appearance, with improper installation causing premature failure regardless of material quality. Each fastener penetrates panel through center of elongated slot rather than at slot ends, positioning that permits free lateral movement during thermal cycling. The fastener drives perpendicular to wall surface, avoiding angular penetration that restricts movement or creates stress concentrations. Slight looseness in fastener installation allows approximately one thirty-second inch movement beneath fastener head, preventing restriction during expansion while maintaining adequate holding power throughout contraction periods.
Horizontal alignment maintains visual appeal and weather performance throughout vertical progression up wall surfaces. Each course should align precisely with adjacent panels, creating continuous horizontal lines that define architectural character. Systematic checking with four-foot level at regular intervals identifies developing alignment problems before they progress beyond correction capability. Panel overlap adjustments at inconspicuous locations accommodate minor misalignments, with gradual corrections distributed across multiple courses rather than concentrated in single dramatic shift that creates obvious discontinuity.
Vertical panel joints require careful attention to prevent conspicuous patterns that detract from uniform appearance across wall surfaces. Staggering joint locations between successive courses distributes visual impact while preventing continuous vertical lines that emphasize individual panel lengths. Minimum stagger distance of sixteen inches separates joints in adjacent courses, creating random pattern that blends into overall wall texture. Strategic joint placement behind architectural features or landscaping elements further minimizes visual impact in most visible wall areas.
Advanced Installation Considerations and Details
Complex architectural features demand specialized installation techniques that maintain weather integrity while accommodating challenging geometries. Gable end installations require precise angle cuts matching roof pitch, with each panel carefully measured and marked before cutting. Template fabrication from scrap material proves worthwhile for repetitive cuts, ensuring consistency across multiple pieces while minimizing waste from cutting errors. The uppermost course beneath gable rake typically requires partial width panels, with cut edges concealed within J-channel or other finish trim components.
Bay windows and other projecting features create three-dimensional transitions requiring creative problem-solving and careful material management. These installations often combine multiple trim components to create weather-tight assemblies accommodating complex angles and transitions. Flashing integration becomes particularly critical where horizontal surfaces meet vertical wall planes, with membrane or metal flashings directing water away from vulnerable intersections. Patient measuring and fitting yields professional results, though challenging details inevitably consume more time than straightforward wall expanses.
Utility penetrations for electrical service, gas lines, plumbing vents, and other building systems require weatherproof integration with siding assemblies. Specialized trim components including split J-channels and utility blocks accommodate round and rectangular penetrations while maintaining aesthetic consistency. Sealant application around penetration perimeters supplements mechanical weather resistance, creating redundant barrier against water intrusion at these vulnerable locations. Penetration locations receive advance planning during furring strip installation, ensuring adequate backing supports trim components without visible gaps or unsupported spans.
Color transitions and accent panels add visual interest while requiring careful planning to execute successfully. Horizontal bands separating different colors need continuous trim components channeling both upper and lower panel edges, with strategic placement at natural breaking points like between building stories. Vertical accent strips similarly require framing on both edges, complicating installation compared to single-color applications. The additional labor and material costs for accent applications deserve consideration during planning phases, balancing aesthetic enhancement against budget constraints.
| Installation Challenge | Difficulty Level | Time Impact | Critical Success Factors | Common Mistakes to Avoid |
| Standard flat walls | Low | Baseline | Consistent fastening, proper expansion gaps | Over-driving fasteners, inadequate clearances |
| Gable ends | Moderate | +30% | Accurate angle measurements, template use | Inconsistent cuts, poor trim integration |
| Bay windows | High | +100% | Patient fitting, proper flashing | Rushing complex details, inadequate weatherproofing |
| Multiple stories | Moderate | +40% | Scaffolding setup, material staging | Poor access planning, safety shortcuts |
| Dormers | High | +80% | Careful flashing, trim coordination | Water management failures, aesthetic mismatches |
Soffit and Fascia Installation
Soffit installation completes building envelope by enclosing underside of roof overhangs, providing finished appearance while facilitating attic ventilation essential for moisture management and temperature control. Soffit panels install perpendicular to wall surface, spanning from wall-mounted receiving channel to fascia-mounted channel along roof edge. Vented soffit panels incorporate perforations allowing air intake feeding ridge or roof vents, with ventilation area calculations ensuring adequate airflow prevents moisture accumulation and excessive attic temperatures. Solid soffit panels suit areas without ventilation requirements, offering uniform appearance where airflow proves unnecessary or undesirable.
Receiving channel installation establishes framework supporting soffit panel edges along wall surfaces and fascia boards. J-channel serves dual purpose when mounted along walls, accepting both soffit panel ends and vertical siding panel terminations at roof line intersection. F-channel along fascia edges creates clean finished edge concealing soffit panel ends while accommodating thermal movement. Channel alignment proves critical for achieving professional appearance, with consistent plane preventing waves or dips visible from ground level. Proper fastening intervals prevent channel sagging between supports, maintaining crisp lines defining architectural character.
Panel cutting and fitting techniques accommodate various overhang widths and architectural configurations encountered in residential construction. Soffit panels typically require cutting to exact width spanning between wall and fascia channels, with measurements taken at multiple points accommodating variations in overhang depth. Angled cuts at gable rake transitions demand careful attention, matching roof pitch while maintaining proper engagement within receiving channels. Mitered corners where soffits transition around building corners require precise cuts creating tight joints that resist water infiltration while presenting unified appearance.
Fascia covering protects exposed rafter tails and roof edge framing while providing substrate for gutter attachment and architectural definition at roof perimeter. Aluminum or vinyl fascia systems wrap existing wood fascia boards, creating maintenance-free surface resistant to weathering and decay. Proper overlap at joint locations creates weather-resistant seams that shed water away from vulnerable edges. Fastener placement through pre-formed channels maintains consistent appearance while securing material against wind uplift forces common at exposed roof edges.
You may also like

